We all know that Elasticsearch is a search server built on top of Lucene. Yet while the authors of Elasticsearch initially only aimed to make data exploration quick and easy, they completely didn’t consider security. Authentication and access control functionalities have been missing from Elasticsearch since Day One. Yet today, because of the growing demand and varied use cases, security is a critical business requirement wherever Elasticsearch or its stack of technologies are used.
With the release of the Elastic Stack 6.8 and 7.1, Elastic made a number of Elasticsearch security features more widely available for free as part of the default distribution. These features include TLS encryption and user authentication with username and password. But there are many enterprise-grade features—such as LDAP and Active Directory-based authentication, SSO/SAML, and encryption at rest—that are still only available in paid (and expensive) versions.
What Is ReadonlyREST?
ReadonlyREST offers a lightweight Elasticsearch plugin that adds encryption, authentication, authorization, and access control capabilities to Elasticsearch-embedded REST APIs. This plugin is an alternative to the Elastic’s X-Pack security plugin and provides high-performance access control for Elasticsearch-native REST APIs.
The ReadonlyREST Elasticsearch security plugin is a free, open source product, but if you want security on Kibana as well, you’ll need the ReadonlyREST PRO or Enterprise plugins. These are commercial products that require the free Elasticsearch plugin to be already installed. In addition, the ReadonlyREST Embedded for Elasticsearch license (which is commercial and involves a yearly licensing fee) makes it possible to use the OSS plugin for Elasticsearch in non-OSS commercial products. A detailed documentation of this plugin can be found here.
Design and Architecture
The core of the ReadonlyREST Free plugin for Elasticsearch is an ACL engine that checks each incoming request through a sequence of rules, similar to a firewall. There are multiple rules that can be grouped in sequences of blocks to form a powerful representation of a logic chain.
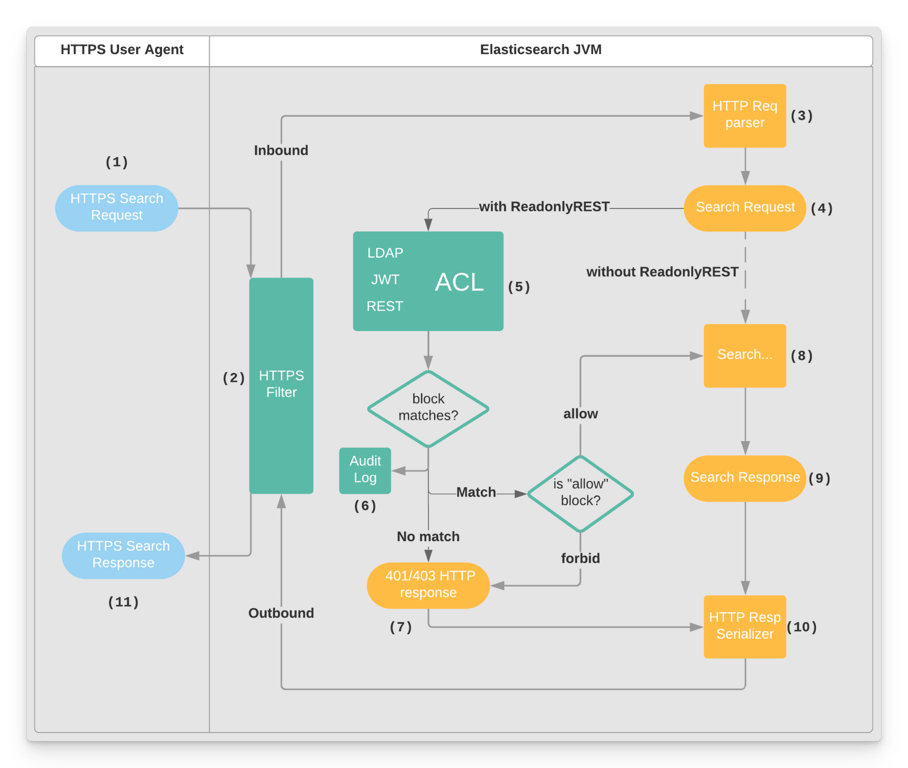
The following diagram models an Elasticsearch node with the ReadonlyREST Free plugin installed, configured with SSL encryption and an ACL with at least one "allow" type ACL block.
HTTP request is intercepted by ROR plugin in Elasticsearch, gets decrypted, ACL is evaluated, processed by Elasticsearch or rejected before a response is produced.
The user agent (i.e., cURL or Kibana) sends a search request to Elasticsearch using the port 9200 and the HTTPS URL schema.
The plugin’s HTTPS filter unwraps the SSL layer and hands over the request to the Elasticsearch HTTP stack.
The HTTP stack in Elasticsearch parses the HTTP request.
The HTTP handler in Elasticsearch extracts the indices, action, and request type, and creates a search request (internal Elasticsearch format).
The search request goes through the ACL; external systems such as LDAP can be asynchronously queried; and an exit result is eventually produced.
The exit result is used by the audit log serializer to write an index record and/or Elasticsearch log file.
If an ACL block wasn’t matched, or if a type: forbid block was matched, ReadonlyREST does not forward the search request to the search engine. Rather, it creates an "unauthorized" HTTP response.
If the ACL did match with the type: allow block, the request is forwarded to the search engine.
The Elasticsearch code creates a search response containing the results of the query.
The Elasticsearch code converts the search response to an HTTP response.
The HTTP response flows back to ReadonlyREST's HTTPS filter and to the user agent.
Key Features
In addition to Elasticsearch’s capabilities, ReadonlyREST provides the following:
Encryption: Transforms the Elasticsearch API from HTTP to HTTPS.
Authentication: Requires credentials.
Authorization: Declares groups of users, permissions, and partial access to indices.
Access control: An ACL written in YAML can be used to model complex logic.
Audit logs: A trace of the access requests can be logged to file or index (or both).
Advantages
When it comes to securing Elasticsearch using free products, there are not many choices. Apart from the ReadonlyREST Free plugin for Elasticsearch, users have two other options:
Elastic’s “xpack.security” module in the non-free Elastic Stack
Reverse proxy using NGINX with basic HTTP authentication
Note that this is no longer recommended because:
Your cluster is still insecure on the server it’s running on, and anyone who has direct access to the node can use the Elasticsearch port to perform all the operations.
Misconfiguring a node's firewall can still lead to vulnerabilities.
Elasticsearch has a vast number of non-standard REST API endpoints, and getting the right configuration for access control is almost impossible.
In contrast to these solutions, ReadonlyREST offers several advantages, including:
Freely available: All the Elasticsearch security features—such as encryption, authentication, authorization, and access control—are free.
Easy setup: The ReadonlyREST Free plugin is very easy to install and set up, and there’s great support available if you run into difficulties.
Easy integration into an existing stack: It is also very easy to integrate the ReadonlyREST Free plugin into an existing stack because you can get the basic security features by configuring it on only one node. In addition, it’s simple to integrate with LDAP for authentication.
Robust features: The ReadonlyREST Free plugin’s security features are more robust than the free features provided by Elasticsearch itself.
Less expensive: The ReadonlyREST Enterprise plugin (which is needed for Kibana) is much less expensive than the commercial Elasticsearch module. In addition, ReadonlyREST’s fixed pricing model will future-proof your organization as ES clusters and nodes grow.
Customization options: Enterprises can inject CSS and Javascript into the look and feel of the ReadonlyREST Enterprise plugin for Kibana, making it seamless for end users.
Integrating ReadonlyREST into ELK Clusters
Points to Consider Before Starting
The most important thing to consider before integrating ReadonlyREST into an ELK cluster is the version compatibility between Elasticsearch and the ReadonlyREST plugin you are using. So, before downloading a plugin, choose the correct version of the ELK stack you are running. If you have a cluster with more than one node of Elasticsearch, there are two options for integrating the plugin:
Install the plugin on a dedicated client node that exposes the HTTP interface over port 9200. You don’t need to install the plugin on all of the nodes in the cluster, and for security hardening, you can even disable the HTTP port on all other nodes. The only drawback of this approach is that document-level security and field-level security are not going to work.
Install the plugin on all client and data nodes in the cluster. This approach is necessary when you need document-level and filter-level security. Document-level security helps you ensure that only the documents that satisfy the query provided as an argument are returned. On the other hand, field-level security ensures that only certain fields from queries are returned.
Prerequisites
To use the ReadonlyREST Free plugin for Elasticsearch, you must first match the plugin version with the version of Elasticsearch you have installed. To download the ReadonlyREST Free plugin, click here. After selecting the product type and Elastic Stack version, simply enter your email address to receive the download instructions. The same steps are required for the PRO and Enterprise Kibana plugins.
Important: If you are using ELK Stack version 6.3.x or greater, you need to disable Elasticsearch’s default X-Pack security module. This is because it can’t run together with ReadonlyREST. To do this, just add the following parameter inside both elasticsearch.yml and kibana.yml -:
xpack.security.enabled: false
Installing and Configuring the ReadonlyREST Free Plugin for Elasticsearch
In this section, we will show you how to configure basic HTTP authentication in Elasticsearch using the ReadonlyREST Free plugin. Once the settings are applied, Elasticsearch will return a “401 Unauthorized error” message in the case of wrong or missing credentials.
Navigate to your Elasticsearch home directory and install the plugin using the following command:
In the above command, /tmp/readonlyrest-1.18.7_es7.3.2.zip is the path of the downloaded ReadonlyREST plugin.
Accept the warning message and continue installation.
During installation, the plugin will show a warning message and ask for additional permissions. Continue the installation by pressing the “y” key, as shown in the following screenshot.
Installation of ReadonlyREST Free plugin for Elasticsearch
Disable the X-Pack security plugin by adding the following parameter inside the elasticsearch.yml file:
xpack.security.enabled: false
Create and edit a file inside the Elasticsearch config directory, parallel to elasticsearch.yml:
If the authentication was successful, the request will return a list of indices. If the authentication was not successful, it will return a “401 forbidden error” message.
All of the authentication parameters and rules are written in the readonlyrest.yml file. In the previous steps, we created a basic authentication using a username and password in plain text format. If you want to create multiple users in a similar way, simply add the similar settings to the file. It will look like this:
In this case, make sure that the name parameter is unique for each block.
Adding SSL Encryption
The ReadonlyREST Free plugin requires your certificates in Java KeyStore (.jks) format. You can also use Let’s Encrypt certificates by converting them into Java KeyStore. For testing purposes, you can generate a self-signed certificate using the following command:
Important: You may get an error that says “curl: (51) SSL: no alternative certificate subject name matches target host name 'localhost.’”
This means that the hostname of the certificate file does not match with localhost. To remedy this, try using the correct domain name server on which you are running Elasticsearch. Otherwise, you need to fix the certificate by adding the correct hostname to it. For testing purposes, you can turn off cURL's certificate verification by using the -k (or --insecure) option.
For example: curl -k -vvv -u user:password "https://localhost:9200/_cat/indices"
Note that as the error message said, access to Elasticsearch is insecure. Therefore, you shouldn't use this option in production, since it allows self-signed certificates.
Sending Data from Logstash to ReadonlyREST-Enabled Elasticsearch
We assume that you already have SSL and basic authentication available inside Elasticsearch (as explained in the previous section), and that you are now ready to ship data from Logstash to Elasticsearch.
To do this, edit the Logstash configuration file and fix the output block as follows:
Sending Data from Metricbeat to ReadonlyREST-Enabled Elasticsearch
Similar to the Logstash process, here you just need to enable the HTTPS protocol and add the Elasticsearch username and password inside Metricbeat’s output block:
Accessing Password-Protected Elasticsearch Using Kibana
If Elasticsearch is protected with basic authentication, you need to add a username and password in the kibana.yml file using the following parameters:
The Kibana server requires these settings in order to perform maintenance on the Kibana index at startup. Your Kibana users still need to authenticate with Elasticsearch while accessing the Kibana UI in the browser, which is proxied through the Kibana server.
Summary
In this post, we discussed what Elasticsearch offers in terms of security. We also explored the many features of ReadonlyREST’s plugins, with a special focus on how to set up the ReadonlyREST Free plugin for Elasticsearch.
In the next post, we will explore how to write sophisticated ACL rules for securing indices and Elasticsearch APIs, along with document-level and field-level security. We will also discuss how to avoid using a plain text username and password by utilizing industry standard encrypted authentication, such as SHA-256. Additionally, we’ll look into advanced authentication configurations such as LDAP and SAML.
Adopting ROR instead of paying for the platinum tier of Elastic cloud is cheaper, permits more advanced integrations, but most importantly: offers multi-tenancy over a single cluster.